Sunday, May 21, 2006

Sunday Quickie: Contour Design's G-Riser

It seemed like a good idea at the time: CPUsed listed Contour Design's G-Riser on sale for $20. There's still a set or two lying around if you want one for some reason.

Ostensibly, the purpose of the G-Riser was to improve airflow and circulation under the G3 and G4 Power Macs; if you actually look underneath a Sawtooth you'll notice an extensive amount of holes at the bottom of the case leading to the inside; most telling is a large gap between the metal panel of the case and the plastic outer panel on the drop-down door. So it seems like of all the Macs using the general Yosemite case form factor, the MDD would be the perfect Mac to use with this add-on, right?

Sadly, you wouldn't exactly know it from the installation guide, but the G-Riser is NOT compatible with the MDD Power Mac G4. The reason being is that there is a large plastic "lip" on the G-Riser which rests on the underside of the Power Mac's front. This in fact the primary way in which the G-Riser attaches itself to the Mac.

And wouldn't you know it: this lip almost totally blocks the primary air intake of the MDD, which is actually on the underside of the front of the Mac (and is not the four "cheese grater holes" on the front face of the Mac as you would commonly expect). Sort of defeats the purpose of an add-on that's meant to improve cooling, right?

Sigh.

Saturday, May 20, 2006

Part III: Hard Drive Bay Cooling Fan

I'm quite stubborn, as my dad would attest. I think I got it from mom.

After declaring to my friend LFyda that I'd surrendered to the $14.99 Vantec iCEBERQ hard drive cooler that I tossed in the trash earlier, I decided to give it another go. Damned if I was going to let myself be beaten by a $15 Taiwanese assemblage of aluminum, copper and plastic. And after all, $15 is $15.

Photobucket - Video and Image Hosting

This image, also taken from the MDD cooling MacMod project page by Jason Schraeder, which also gave me ideas and inspiration for my own project, gives an idea of what I did with the iCEBERQ and my main hard drive. Screw the hard drive cooler onto the bottom of the drive as normally instructed, and then mount the hard drive backwards in the bottom position on the drive cage so that the smooth side of the hard drive (the "top" of the drive, i.e. the side with the labels and metal shielding on top) was right against the side of the computer. The only difference is that he used a more modern SATA drive and a cheaper hard drive cooler powered by two small, fast fans (one of which he removed). I used the stock 80 GB Seagate ATA-100 drive that came with my Mac; the iCEBERQ has a single 70 mm fan which moves a lot more slowly, and a lot more quietly.

This was a possibility I'd considered earlier, but ruled out because I was afraid that with the drive positioned like this, the drive cooler's fan would blow hot air from the processor heatsink onto the drive's circuitry. But I realized that that wouldn't be so much of an issue since the rear drive cage is up against the main 120 mm fan; any hot air would be theoretically be blown away by the main fan. Anyway, it was a tight fit, but it worked.

TIP: When doing this, screw the first two screws in on both sides first - with the drive facing towards you, screw the front two screws in on the left and right side. Slide the drive into the cage slowly, and then screw the remaining two screws in. Otherwise, the drive and cooler assembly won't fit into the drive cage. (I know it's hard to follow when all you need to go on are just words. Damn, I wish I had a real digital camera.) It's a very, very tight fit, but it does work.

A consequence of this was that the ATA ribbon cable would have be twisted around quite a bit; to try to get around this, I ended up buying a special round ATA cable. Trouble was, it was way too long for its own good; I had to coil it around the floor of the Mac like a snake to get it to fit.


Needful Things

Along the way, I decided to do a little splurging. Not to be outdone by the 1.25 GB of RAM on the older Sawtooth G4 (how it got that way is another story), I upped the memory to a dainty 1.5 GB: perfect for running Ubuntu Linux and Windows XP Home simutaneously in Virtual PC. After discovering the joys of using Mike Bombich's CarbonCopyCloner, I realized that I needed more drive space to store incremental backups and other files; the 80 GB Western Digital drive I'd installed years before was now devoted entirely to being a full backup clone of my boot drive. So in came another Western Digital 80 GB drive. I lost the blazing fast Yamaha FireWire CD burner to the Sawtooth, so I wanted to get a fast CD burner to put in the second optical drive bay, since the stock OEM Pioneer DVR-105 is a laggard at burning CDs/CD-RWs. Unfortunately, none of the stores I visited actually had in stock the $30 internal CD burner I wanted, but for $14 extra at Sonnam, I could get the latest and greatest disk burning drive from Pioneer; the DVR-110D dual-layer +/- DVD burner...and it's a pretty capable CD-burning drive, to boot.

It's worth noting that the DVR-110D actually has OS 9 support, through a modified Burn Support file posted to xl8yourmac. That and in 10.4.6, the 110D now has "Apple Shipped/Supported" status in OS X, meaning that it officially has full burn support. If you don't run OS 9, then it doesn't really matter; for a few months I used the 110D in the MDD under 10.4.4 and 10.4.5 listed as "Supported (Not Supported)" in System Profiler, and from what I've read it seems that the 110D's replacement, the DVR-111/111D, shows up with this in System Profiler now. In short, if you see the 111 and don't care about OS 9, it's worth getting this drive over the 110D.

Hard to imagine that not too long ago, DVD-burning drives would set you back several hundred dollars, just for a bare OEM drive. When the first Pioneer units trickled out (about the same time Apple started hyping them as "SuperDrives" on the Digital Audio G4/733), I remember a bare drive costing $999. Now, at $44, they're practically giving them away.

Photobucket - Video and Image Hosting

Geez, I'm never going to be able to explain how I ended up with three hard drives and dual DVD-burning SuperDrives in my Mac to my friends without ending up looking like a massive tech-whore. Sigh.

Thursday, May 04, 2006

The MDD Chronicles: Part II (Dual 60 mm fans)

Some people go to absolutely extraordinary lengths to cool their MDD Power Macs. I wasn't about to go crazy with the power tools on my Mac, especially since it's long out of warranty and I'm sure parts as mundane as the plastic front panel would cost me an arm and a leg (plus iI feel it'd be somewhat wrong to put two gaping holes in the top of my sleek, beautiful Mac).

Nevertheless, I love taking risks, which probably might come as a surprise to the people who usually know me to be the shy, reserved, introverted type -- which I usually am. So, with some trepidation, I decided to wade into further the world of computer modding.

After trying to scour the web for days trying to find hints on how to (non-destructively!) cool and/or quiet down my MDD, I came across Steve Smedley's homepage, where he documented a pretty cool trick which didn't look very hard.

Image hosting by Photobucket

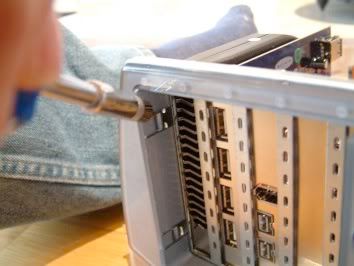
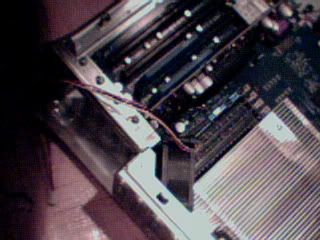
Pop off a part of the back plastic panel of the MDD with a flat head screwdriver, and you can access the perforated metal grille below. Then, after sliding two 60 x 60 x 25 mm fans behind the processor heatsink, screw them into the grille, and pop back the panel. You now have an easy way of increasing the cooling on the typically hot heatsink.

It seemed a lot easier than two other mods I'd looked into. The first involved the use of a hard drive cooler similar to mine, retrofitted with two 60 mm fans. Problem was, I couldn't find any store, in Toronto or on the Internet, which sold the kind of hard drive cooler that he used. All of the coolers I've seen bolt directly on to the back of a hard drive; this one apparently screws into a 3.5" hard drive bay much like a hard drive itself. The second involved the mounting of 60 mm fans directly onto the processor heatsink itself. This mod involved the use of something called "Tiger Elastic Fixation", a sort of plastic rubber anti-vibration fixture. Trouble is, I couldn't find anything quite like this that was locally available; at least, nothing that would be able to fit in between the fins of my heatsink. Furthermore, it seems that there are two types of aluminum heatsink used on the MDD; the first is a type that's more traditional, with the fins broad at the base and tapering off at the tip; the one on mine is a series of thin aluminum plates stacked horizontally, so I wasn't sure if I could do this with my heatsink (the aluminum plated one). And then of course, the fact that the heatsink currently runs in excess of 40-60 degrees C; I couldn't help but shudder at the thought of melted rubber fusing itself to my heatsink.

So, Smedley's hack was the one to use. I'm a creature of habit, so having had experience with a Vantec hard drive enclosure, I decided to use a Vantec fan, from their much lauded "Steath" product line.

A lot of the shops on College Street don't seem to sell cooling parts -- at least, that's the impression you'd get if looked at the websites for all of the various computer stores on College Street. The only place I saw which seemed to have a good variety was Bigfoot Computers, a store near the corner of Jane and Dundas. After visiting several stores trying to find the vaunted Vantec Stealth fan, it seemed like this was the last place on earth that had them -- and they only had one left. I remember the experience of my first time visiting there was rather amusing; the guy eyed me nervously and with some mix of bewilderment, confusion, and suspicion. I think he thought I was going to stick him up, or dash out the door with my merchandise before I paid for it. Maybe that or he just didn't expect a brown-skinned guy to be into the whole PC-modding thing. Or maybe they just don't get a lot of foot traffic into their retail store. I mean, hey, the corner of Jane and Dundas is a far cry from the strip of College Street between Spadina and Bathurst.
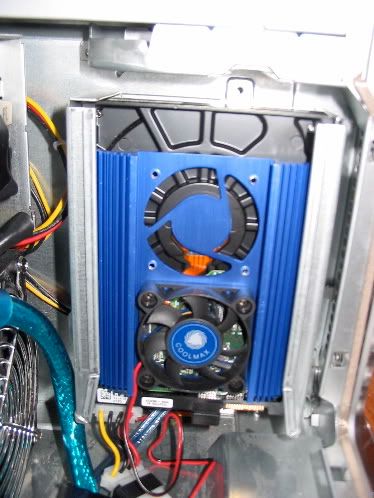

Oh Snap

Anyway, I get home, a little cocksure. I mean, hey, if Smedley could put two 60 mm fans behind his heatsink to cool off his MDD with just a flat-head and Philips-head screwdriver, I could do it, right? Only, there's one problem...

Image hosting by Photobucket

The bloody fan won't fit behind the heatsink. Damn. There's just no getting around it. At least, not without damaging the heatsink. And this fan certainly wasn't cheap. I didn't go to all of the trouble I had to go to, to get the fan only to end up not using it. I had to use it somehow. Okay, what about removing the heatsink and then attaching the fan? No can do: you need to reapply thermal paste to the CPU's after you remove and before you reattach the heatsink. Which I didn't have. Plus, in a catch-22, you couldn't screw the heatsink back in without removing the 60 mm fan to gain access to the three rear heatsink screw holes. Damn. Then, remembering Jason Schraeder's MDD cooling project highlighted on MacMod, I realized that the only thing I could do to not let the fan go to waste was to just strap it to the back of my Mac with plastic wire ties.

Yeah, it looked ghetto. At least his installation was more professional, since he used machine screws. In fact, my attempt was so ghetto that I was glad that I didn't have access to a camera to document this project. The copper heatsink (the third type of heatsink commonly seen on MDDs) seems to be the only common denominator among people with MDDs who easily did this hack without disassembling their motherboard. The copper heatsink, while much taller, seems to be more narrower at its base than the aluminum heatsinks, affording more clearance for the fans. Damn.

To add to the hilarity, I noticed something funny about something else I bought at Bigfoot: a set of plastic slot covers also from Vantec, ostensibly meant to cover free RAM and PCI slots to prevent dust build-up. The PCI slot covers, however, only covered up 2/3 of the actual PCI slot. Huh? I then remembered: Apple used full-length 64-bit, 33 MHz PCI slots in pretty much all of its G4 and later G3 Power Macs. Guess what the majority of PC motherboards use? Smaller, 66 Mhz PCI slots (which, according to what I've seen, can be either at 32-bits or a full 64-bits). Ah, right. This is Apple we're talking about. A company that builds its computers with as many non-standard or uncommon parts as possible, quite possibly for the sole purpose of pissing off to the fullest extent people who dare to add anything standard to their hardware. Thanks, Apple. Thank you, so very, very much...

The MDD Chronicles: Part I (Hard Drive Fan)

The last revision of the Power Macintosh G4 was called the "Mirrored Drive Doors" G4 (or "MDD", for short), so-called because it's dual optical drive bay doors were given a sleek metallic-like mirror polish. Inside, it had the best of Apple's technology: DDR SDRAM system memory fed to dual PowerPC G4 processors through a "System Controller" chip, a system inherited from Apple's G4-based xServe.

It was in some way a sign of ingenuity and desperation on the part of Apple's hardware engineers; with the Power Mac G5 still coming, Apple had to something, anything to keep its G4-based desktop computers in line with their Intel and AMD-based equivalents. The G4's antiquated bus couldn't handle the bandwidth of the new memory, so they had to find a way to work around it. It's in many ways a symbol Apple with it's back against the wall, trying to find a way to do the best with what they had.

Anyway. My friend Renee told me that I need to blog more about myself, so, I decided to do so, by putting up a series of posts as a chronicle of my quest for a quieter, cooler computer.

Image hosting by Photobucket

This is my computer; a June 2003 MDD Power Mac G4, the last Mac Apple ever made capable of natively booting Mac OS 9. The main distinction that this computer has from the earlier 2002 models is that, like the later 2002/2003 MDDs which couldn't boot OS 9, they sported several modifications to make you actually believe that yes, that was a Mac under your desk and not an F-16 taking off on full afterburner.

Also, they sported huge heatsinks, and an internal arrangement reflecting how Apple tried to pack as many things as they could within the confines of the G4 case. As you might imagine, With two optical drives, four hard drives, and 2 GB of RAM plus four PCI cards and a graphics card all crammed together with dual 1.25 Ghz G4 processors, things have the potential to get very hot, very quickly.


If it don't fit, don't force it...

My odyssey began with a trip to Canada Computers on College Street. Ah, College Street. A little slice of heaven for a computer geek, where you can wade into rows of computer stores owned and operated by shifty-eyed Asian families who always seemed to know a lot more about you and the stuff you were buying than they were letting on, selling a panoply of obscure and common computer stuff for suspiciously low prices.

Naively, I picked up a $15 Vantec Hard Drive cooler to use with my boot drive, expecting that somehow, some way, it would work with my system...

Errr. Yeah. I bring it home and I realize that the rear drive cage can't accomodate the height of the drive with the hard drive cooler screwed on its bottom. It's best described in pictures, but I don't have a digital camera, so a short description will have to do; the rear drive cage in the MDD has special slots to allow a standard 3.5" IDE drive to slide inside. Since the cooler adds a few more millimeters of height to the drive, the drive won't fit in the cage; the slots aren't big enough. I tried unscrewing it, and attaching it to the cage itself above the drive with plastic wire ties; it worked, but oddly enough my system kept on freezing after waking from sleep.

I then tried attaching it to the top of the drive by attaching it to cage, via more wire ties; this time, it prevented a signal from appearing on my monitor, causing the screen to cease functioning (!?!?). After about a week of fruitless agonizing over finding some way to mount this fan, I gave up and tossed it out of sheer frustration.

Oh well. Better luck next time?

And so it begins...

I've set up this blog to specifically log my exploits in my quest to improve the cooling and noise of my June 2003/FW-400 Dual-1.25 Ghz MDD PowerMac G4...partly because I wanted to make sure I'd keep track of what I did, and partly becuase I hope that this will come as something of helpful lesson to other PowerMac G4 owners who are looking into fiddling with their system. I think this is especially important as the two main sources of information and help with upgrading and improving the cooling and noise of the PowerMac G4 (especially later models like the MDD) - G4noise.com and the YahooGroups G4noise email discussion group - seem to have been lost forever to history.

The first two posts to this blog were originally posted to my main, personal blog...originally I had intended to make this a continuing series on my blog, but I realized that a lot of my friends aren't really interested in stuff like this, and I'd like other people to see what I've been doing and give me feedback without worrying about them looking at more personal stuff I post to my blog.

I'll post more later about how I got started, but the general gist is that I was encouraged to start this project by viewing sites like Steve Smedley's Aqua-Mac page, and the various pages found on xlr8yourmac. My aim was simple:

1) Improve the cooling of the G4 (as quantified by Marcel Bresink's Temperature Monitor)
2) Improve the noise output of the G4 (in terms of reducing fan noise output)
3) Keep it bootable in OS 9
4) Not break the bank in process

So did I succeed? Well, for all the trouble I had to go through, I hope so...