Part III: Hard Drive Bay Cooling Fan
I'm quite stubborn, as my dad would attest. I think I got it from mom.
After declaring to my friend LFyda that I'd surrendered to the $14.99 Vantec iCEBERQ hard drive cooler that I tossed in the trash earlier, I decided to give it another go. Damned if I was going to let myself be beaten by a $15 Taiwanese assemblage of aluminum, copper and plastic. And after all, $15 is $15.
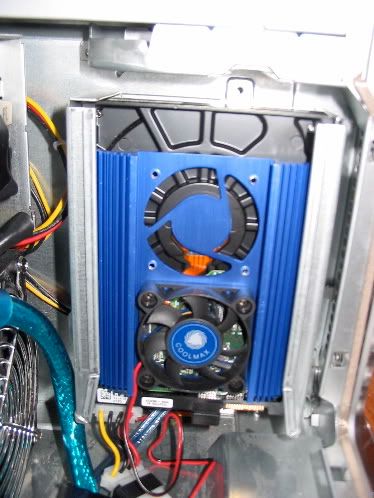
This image, also taken from the MDD cooling MacMod project page by Jason Schraeder, which also gave me ideas and inspiration for my own project, gives an idea of what I did with the iCEBERQ and my main hard drive. Screw the hard drive cooler onto the bottom of the drive as normally instructed, and then mount the hard drive backwards in the bottom position on the drive cage so that the smooth side of the hard drive (the "top" of the drive, i.e. the side with the labels and metal shielding on top) was right against the side of the computer. The only difference is that he used a more modern SATA drive and a cheaper hard drive cooler powered by two small, fast fans (one of which he removed). I used the stock 80 GB Seagate ATA-100 drive that came with my Mac; the iCEBERQ has a single 70 mm fan which moves a lot more slowly, and a lot more quietly.
This was a possibility I'd considered earlier, but ruled out because I was afraid that with the drive positioned like this, the drive cooler's fan would blow hot air from the processor heatsink onto the drive's circuitry. But I realized that that wouldn't be so much of an issue since the rear drive cage is up against the main 120 mm fan; any hot air would be theoretically be blown away by the main fan. Anyway, it was a tight fit, but it worked.
TIP: When doing this, screw the first two screws in on both sides first - with the drive facing towards you, screw the front two screws in on the left and right side. Slide the drive into the cage slowly, and then screw the remaining two screws in. Otherwise, the drive and cooler assembly won't fit into the drive cage. (I know it's hard to follow when all you need to go on are just words. Damn, I wish I had a real digital camera.) It's a very, very tight fit, but it does work.
A consequence of this was that the ATA ribbon cable would have be twisted around quite a bit; to try to get around this, I ended up buying a special round ATA cable. Trouble was, it was way too long for its own good; I had to coil it around the floor of the Mac like a snake to get it to fit.
Needful Things
Along the way, I decided to do a little splurging. Not to be outdone by the 1.25 GB of RAM on the older Sawtooth G4 (how it got that way is another story), I upped the memory to a dainty 1.5 GB: perfect for running Ubuntu Linux and Windows XP Home simutaneously in Virtual PC. After discovering the joys of using Mike Bombich's CarbonCopyCloner, I realized that I needed more drive space to store incremental backups and other files; the 80 GB Western Digital drive I'd installed years before was now devoted entirely to being a full backup clone of my boot drive. So in came another Western Digital 80 GB drive. I lost the blazing fast Yamaha FireWire CD burner to the Sawtooth, so I wanted to get a fast CD burner to put in the second optical drive bay, since the stock OEM Pioneer DVR-105 is a laggard at burning CDs/CD-RWs. Unfortunately, none of the stores I visited actually had in stock the $30 internal CD burner I wanted, but for $14 extra at Sonnam, I could get the latest and greatest disk burning drive from Pioneer; the DVR-110D dual-layer +/- DVD burner...and it's a pretty capable CD-burning drive, to boot.
It's worth noting that the DVR-110D actually has OS 9 support, through a modified Burn Support file posted to xl8yourmac. That and in 10.4.6, the 110D now has "Apple Shipped/Supported" status in OS X, meaning that it officially has full burn support. If you don't run OS 9, then it doesn't really matter; for a few months I used the 110D in the MDD under 10.4.4 and 10.4.5 listed as "Supported (Not Supported)" in System Profiler, and from what I've read it seems that the 110D's replacement, the DVR-111/111D, shows up with this in System Profiler now. In short, if you see the 111 and don't care about OS 9, it's worth getting this drive over the 110D.
Hard to imagine that not too long ago, DVD-burning drives would set you back several hundred dollars, just for a bare OEM drive. When the first Pioneer units trickled out (about the same time Apple started hyping them as "SuperDrives" on the Digital Audio G4/733), I remember a bare drive costing $999. Now, at $44, they're practically giving them away.
Geez, I'm never going to be able to explain how I ended up with three hard drives and dual DVD-burning SuperDrives in my Mac to my friends without ending up looking like a massive tech-whore. Sigh.
After declaring to my friend LFyda that I'd surrendered to the $14.99 Vantec iCEBERQ hard drive cooler that I tossed in the trash earlier, I decided to give it another go. Damned if I was going to let myself be beaten by a $15 Taiwanese assemblage of aluminum, copper and plastic. And after all, $15 is $15.
This image, also taken from the MDD cooling MacMod project page by Jason Schraeder, which also gave me ideas and inspiration for my own project, gives an idea of what I did with the iCEBERQ and my main hard drive. Screw the hard drive cooler onto the bottom of the drive as normally instructed, and then mount the hard drive backwards in the bottom position on the drive cage so that the smooth side of the hard drive (the "top" of the drive, i.e. the side with the labels and metal shielding on top) was right against the side of the computer. The only difference is that he used a more modern SATA drive and a cheaper hard drive cooler powered by two small, fast fans (one of which he removed). I used the stock 80 GB Seagate ATA-100 drive that came with my Mac; the iCEBERQ has a single 70 mm fan which moves a lot more slowly, and a lot more quietly.
This was a possibility I'd considered earlier, but ruled out because I was afraid that with the drive positioned like this, the drive cooler's fan would blow hot air from the processor heatsink onto the drive's circuitry. But I realized that that wouldn't be so much of an issue since the rear drive cage is up against the main 120 mm fan; any hot air would be theoretically be blown away by the main fan. Anyway, it was a tight fit, but it worked.
TIP: When doing this, screw the first two screws in on both sides first - with the drive facing towards you, screw the front two screws in on the left and right side. Slide the drive into the cage slowly, and then screw the remaining two screws in. Otherwise, the drive and cooler assembly won't fit into the drive cage. (I know it's hard to follow when all you need to go on are just words. Damn, I wish I had a real digital camera.) It's a very, very tight fit, but it does work.
A consequence of this was that the ATA ribbon cable would have be twisted around quite a bit; to try to get around this, I ended up buying a special round ATA cable. Trouble was, it was way too long for its own good; I had to coil it around the floor of the Mac like a snake to get it to fit.
Needful Things
Along the way, I decided to do a little splurging. Not to be outdone by the 1.25 GB of RAM on the older Sawtooth G4 (how it got that way is another story), I upped the memory to a dainty 1.5 GB: perfect for running Ubuntu Linux and Windows XP Home simutaneously in Virtual PC. After discovering the joys of using Mike Bombich's CarbonCopyCloner, I realized that I needed more drive space to store incremental backups and other files; the 80 GB Western Digital drive I'd installed years before was now devoted entirely to being a full backup clone of my boot drive. So in came another Western Digital 80 GB drive. I lost the blazing fast Yamaha FireWire CD burner to the Sawtooth, so I wanted to get a fast CD burner to put in the second optical drive bay, since the stock OEM Pioneer DVR-105 is a laggard at burning CDs/CD-RWs. Unfortunately, none of the stores I visited actually had in stock the $30 internal CD burner I wanted, but for $14 extra at Sonnam, I could get the latest and greatest disk burning drive from Pioneer; the DVR-110D dual-layer +/- DVD burner...and it's a pretty capable CD-burning drive, to boot.
It's worth noting that the DVR-110D actually has OS 9 support, through a modified Burn Support file posted to xl8yourmac. That and in 10.4.6, the 110D now has "Apple Shipped/Supported" status in OS X, meaning that it officially has full burn support. If you don't run OS 9, then it doesn't really matter; for a few months I used the 110D in the MDD under 10.4.4 and 10.4.5 listed as "Supported (Not Supported)" in System Profiler, and from what I've read it seems that the 110D's replacement, the DVR-111/111D, shows up with this in System Profiler now. In short, if you see the 111 and don't care about OS 9, it's worth getting this drive over the 110D.
Hard to imagine that not too long ago, DVD-burning drives would set you back several hundred dollars, just for a bare OEM drive. When the first Pioneer units trickled out (about the same time Apple started hyping them as "SuperDrives" on the Digital Audio G4/733), I remember a bare drive costing $999. Now, at $44, they're practically giving them away.
Geez, I'm never going to be able to explain how I ended up with three hard drives and dual DVD-burning SuperDrives in my Mac to my friends without ending up looking like a massive tech-whore. Sigh.
posted by Ctenuchid at 7:36 PM
![]()
![]()


0 Comments:
Post a Comment
<< Home